How to Create an App Install Campaign in Google Search
Mobile app install ads link to your app's listing on Google Play or the Apple App store and can run on the Google Search Network. They allow users to install your app directly from your ad. Based on where your ad appears, any original content may be added to, removed, or modified during the ad serving process. Google Ads does this to help make sure that users get a great experience from your ad, no matter when and where they see it.
We will go through the setup process of a search campaign where searchers can download your app when they click on the app extension.
Quick Navigation
1. Campaign
2. Ad Group
3. Responsive Search Ad
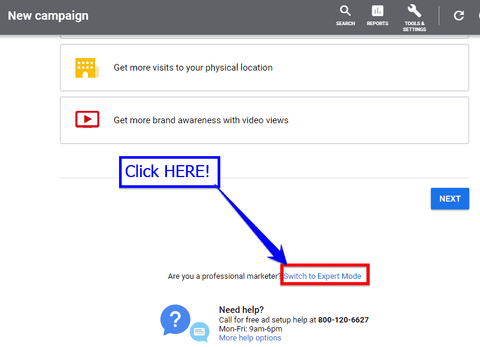
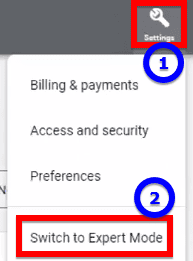
First of all, we need to make sure that we are in Expert Mode. If you are still in Smart Mode, please switch to Expert Mode.

You need to find and click the link that says, 'Switch to Expert Mode'.

Campaign
To set up an app install ad extension for a search campaign, click ‘Campaigns’ followed by ‘New campaign’.


There are multiple objectives available, and I normally choose ‘Leads’ as my objective.

Then click ‘Continue’.

You’ll be asked to select a campaign type – click ‘Search’.
When asked to select the way(s) to reach your goal,
Choose ‘App downloads’.

Depending on your app,

You can choose either iOS or Android.
Then look up your app by typing in the name in the search bar.

Especially when you have multiple apps with similar names, be sure to pick the right app that you want to promote.
Enter your campaign name.

Then click ‘Continue’.

You will be brought to budget and bidding.

Set an affordable average daily budget for you.
For bidding,

Assuming no conversion data, focus on clicks.

Check the box that says ‘Set a maximum cost per click bid limit’ then enter your maximum CPC bid limit e.g., $1.50. This is the highest amount per click that Google can legally charge you, but very often the actual cost per click will be lower than what you bid.
Next is ad rotation.

You can leave it as default, but I would prefer to rotate ads indefinitely.

Click ‘Next’.
Under Networks,

Do NOT include Google search partners because keyword matching does not work outside Google SERPs.

Do NOT include Google Display Network because we are running a search campaign and it’s a bad idea to mix search with display ads. If I really need to, I would rather setup a separate campaign to focus on the Display Network. We need to keep our campaigns segmented so we know where our advertising dollars are giving the best results.
For Locations,

Select Singapore.
Under Languages,

Select the language that your customers speak. If you have an English app, select English but do not mix languages here i.e., only select one language so it’s easier to troubleshoot if your campaign is not getting results.
For audience segments,

We can skip this first and select audiences later.
For Dynamic Search Ads setting,

We can skip this because we are creating Responsive Search Ads.
For start and end dates,

You do not have to set an end date if you don’t plan to stop at a certain date.
For Ad Schedule,

You don’t have to change this if you want your ads to run 24/7.
For campaign URL options,

You can skip this if you don’t have a tracking template.

Click ‘Next’.
Ad Group
You’ll be brought to keywords and ads.


Edit the ad group name for easier reference.
To get keyword ideas:

- You can enter your web page URL or someone else’s web page that is related to what you are promoting
- Enter the product or service you are offering
- Leverage the Google Keyword Planner Tool
In this illustration,

Enter the URL then click ‘Get keywords’.

You will see a list of keywords that Google thinks are relevant to the URL you entered.

Proceed to clean up the list to remove keywords that are unlikely to result in a conversion.

Proceed to include notations for the different match types so you have Broad Match, Phrase Match and Exact Match versions of the keyword.
Include your negative keyword if you can anticipate them. Place a minus sign (-) in front of the keyword to make it negative.

Next is your Responsive Search Ad.

Enter your final URL and display path.
Enter your headline.

Ensure your position 1 headline contains the words that you are bidding.
You can click the pin icon and pin the Headline to only show in position 1.


Click ‘More ideas’ to get more headline ideas.
Fill up the rest of the headlines.


Likewise, for descriptions, you can get more ideas by clicking ‘View ideas’ then simply include them in your ad copy.

On the right, you see a preview of how your ad can appear if it gets approved.

Click ‘Done’ when you are done.
Then click ‘Next’.

Next comes Extensions.

Click ‘More extensions’.

Click ‘App extensions’.
Select the type of app that is applicable to your business i.e., iOS or Android or both.


Click ‘Preview’ to see how your app extension looks like.
Under ‘New app extension’ and ‘Device preference’,


You have the option to exclude tablets. This will make sense if you have data that tablet users do not convert well. Otherwise, you should not exclude tablets.

Then click ‘Next’.

Review your campaign:
Double-check your details before you publish.
If everything is in order,

Click ‘Publish campaign’. Google will review your campaign and when approved, your ad will go live.
It is also good to know: